At Microsoft Ignite in 2025, the Microsoft Security Product Team announced that Security Copilot is now included in M365 E5 and that the rollout will begin in Early 2026. We here we are in Early 2026 and your tenant may have already received your Security Compute Units, or you may be in the planning stages as to how to use them and make the most of your monthly allocation.
Whether you’re a security leader preparing for rollout or an engineer ready to dive in, this guide walks you through exactly what you should do next, how to plan, and some of the low hanging fruit you can accomplish to maximize your new Security Copilot allocation.
What’s Included With Security Copilot in M365 E5
1) Automatic Access and Activation
Starting January 1, 2026, all Microsoft 365 E5 customers automatically gain access to Security Copilot. Microsoft provides 30 days of advance notice before activation so teams can prepare. Rollout is phased tenant‑by‑tenant.
2) Monthly SCU Allocation
Each E5 tenant receives a built‑in SCU pool used to power AI workflows such as incident summarization, guided investigation steps, and threat correlation.
- 400 SCUs per month per 1,000 E5 users
- Pro‑rated for smaller tenants
- Maximum of 10,000 SCUs per month included
This predictable capacity model eliminates the old pay‑per‑use uncertainty. However, if customers do need more than their allocation of SCUs that they receive with E5, they can purchase more via an Azure Subscription.
3) Deep Integration with Microsoft’s Security Stack
Security Copilot works directly inside tools you already rely on:
- Microsoft Defender
- Microsoft Entra
- Microsoft Intune
- Microsoft Purview
- Standalone Security Copilot portal
4) First Party Agents
Within Security Copilot there are many 1st and 3rd party Agents already developed. We will cover these a little later in this post. You can also see all of the 1st party Agents here: Microsoft Security Copilot agents | Microsoft Learn
5) Custom Agent Support
E5 customers can build custom agents using Agent Builder and available APIs, enabling advanced automation across your environment.
Step‑by‑Step Guide: What to Do Next
Step 1: Confirm Activation Timeline
If you haven’t received an activation notice yet, expect one 30 days before your tenant is enabled. Rollout occurs in phases.
Action: Monitor the Microsoft 365 Message Center for the activation message and plan change communications accordingly. Especially monitor the message center if you use PIM for your admin roles as you may not receive the email notification if your role isn’t activated at the time of sending. You may want to also consider permanently adding someone as a Message Center Reader so they can get notifications at all times.
Step 2: Map Your SCU Consumption Strategy
SCUs are the “fuel” for Security Copilot. Workflows such as incident summarization or cross‑signal correlation consume compute units. It will be important in the first few months to monitor your SCU usage to ensure your agents or incident summarization aren’t “eating” too many SCUs.
Action plan (this is easier said than done):
- Estimate initial usage based on SOC workload volume
- Prioritize high‑value use cases (phishing, identity compromise)
- Set SCU budgets per team or per workspace (not very realistic, but still something to consider)
- Evaluate automatic incident summarization or manual. This can save on SCUs but may have the SOC Analysts forgetting about a very valuable tool at their fingertips.
The included allocation: 400 SCUs/1,000 E5 users (capped at 10,000)—gives most organizations room to experiment broadly without surprise costs.
Step 3: Ensure Your Security Signals Are Healthy
Security Copilot amplifies your security posture, but it is only as good as the data it is fed. Poor data ingestion or no data ingestion means lower‑quality AI insights. This may be a driving factor in adopting/enabling some additional Microsoft features so Security Copilot can have the necessary telemetry to provide valuable insights.
Checklist:
- Verify Microsoft data sources and incident integration are deployed
- Defender for Identity
- Defender for Endpoint
- Defender for Office 365
- Defender for Cloud Apps
- Defender for Cloud
- Entra
- Validate Intune device compliance and risk signals
- Confirm Purview DLP, sensitivity labels, and data classification are active
Step 4: Activate Copilot Inside Your Tools
Once enabled, your team can immediately access Copilot within their existing consoles:
- Defender XDR: investigations, incident summaries, guided response
- Entra: identity risk analysis and access insights
- Intune: device risk and compliance‑driven actions
- Purview: data security and insider risk assistance
- Security Copilot Portal: natural language prompts to Security Copilot itself
Action: Train SOC analysts to use Copilot prompts on real cases and start with current incidents for immediate context. Even consider a hackathon competition amongst your analysts to find the best application for Security Copilot for process improvement, incident resolution time, etc.
Step 5: Consider Adopting These 4 Recommended Security Copilot Agents First
Microsoft’s out‑of‑the‑box 1st party agents deliver fast time‑to‑value by automating common workflows across email, identity, endpoint, and data. Below are four high‑impact agents to prioritize. We also provide guidance on prerequisites, prompts, KPIs, and SCU considerations. (There are many more agents to evaluate as you mature.)
1) Phishing Triage Agent
What it does:
Automates analysis of reported phishing emails. The Phishing Triage Agent extracts IOCs, evaluates sender and domain reputation, inspects links/attachments, correlates with Defender signals, and drafts or automatically completes recommended actions or user comms.
Best places to use it:
- High‑volume phishing queues from Report Message add‑ins
- Post‑incident campaign scoping in Defender XDR
Prerequisites:
- Defender for Office 365 telemetry
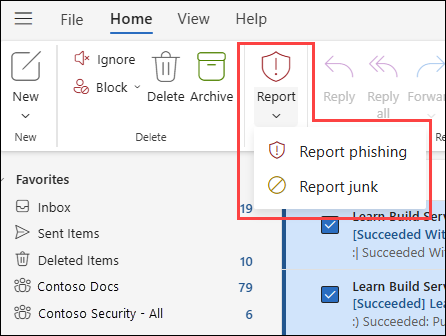
- User reporting via the Report Message button in Outlook.
- The agent triggers off of the alert in Defender XDR titled “User Reported Message as Phish”
- The agent does not trigger based on emails landing in a Secops Mailbox, so you need to make sure users are reporting messages using these buttons OR setting up an automation that will do it on their behalf.
Watch a Video Demonstrating the Phishing Triage Agent in Action:
2) Conditional Access Optimization Agent
What it does:
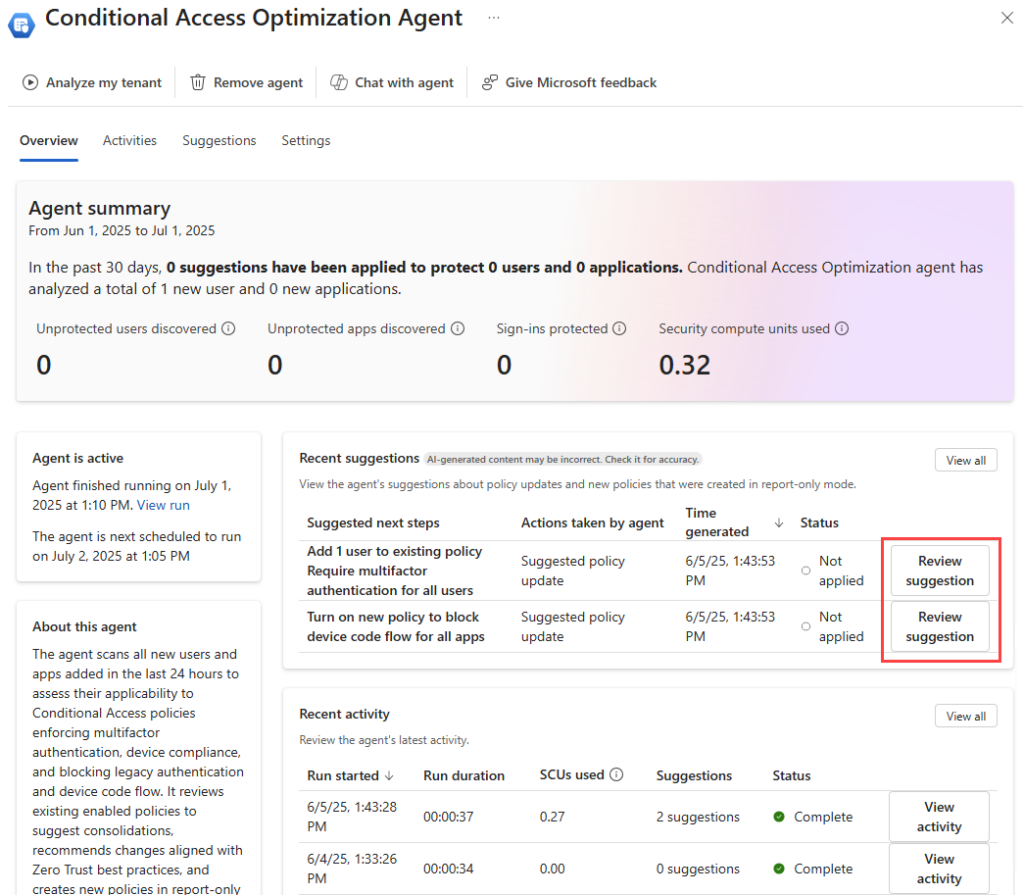
Analyzes your Conditional Access (CA) policies, flags conflicting or overly permissive rules, identifies stale exceptions, and recommends right‑sizing based on identity risk and usage patterns.
Best places to use it:
- Tenants with growth‑by‑exception CA sprawl
- M&A integrations or tenant consolidations
- Scenarios with confusing or unknown conditional access policy configurations
Prerequisites: Entra ID sign‑in logs, CA policies in scope; defined baseline MFA/risk posture.
Starter tasks:
- Agent First Run Scan: The agent scans all Conditional Access policies in your tenant and checks for policy gaps, consolidation, and compiles recommendations.
- These initial scanning steps do not consume any SCUs.
- You can provide specific instructions like BreakGlass or Emergency Access account names / groups.
3) Dynamic Threat Detection Agent
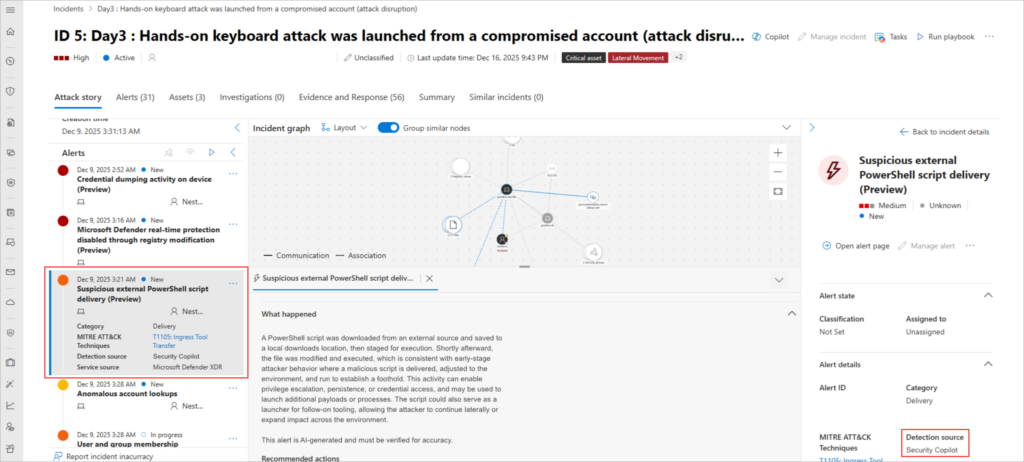
The Dynamic Threat Detection Agent uses AI to identify gaps and uncover false negatives by correlating alerts, events, anomalies, and threat intelligence. When the agent identifies a gap, it generates a dynamic alert with the full context in the alert details, including natural language explanations, mapped MITRE ATT&CK techniques, and tailored remediation steps.
The Dynamic Threat Detection Agent is always on, operates seamlessly in the Defender backend, and requires no setup or onboarding. These features and capabilities empower organizations to detect and respond to threats with greater speed, accuracy, and confidence.
Starter Tasks:
The Dynamic Threat Detection Agent runs automatically in the background. When it generates an alert, the alert shows up in your incidents and alerts queues with Security Copilot as the Detection source.
4) Identity Risk Management Agent
What it does:
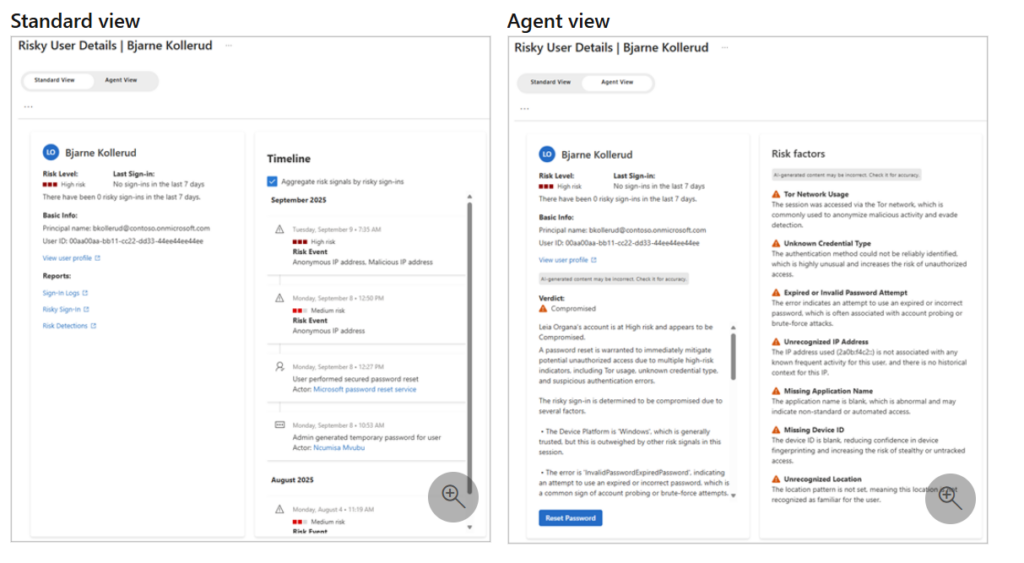
The Identity Risk Management Agent with Security Copilot in Microsoft Entra helps IT and Security professionals investigate potential risks, understand their effect, and take decisive action to protect their organization’s critical assets.
How it works:
- Investigate the risky user: The agent checks the user’s risky sign-ins and risk detections to analyze what’s risky about this user.
- Generate findings and a risk summary: The agent generates findings based on the investigation, which includes a thorough risk summary explaining the suggestion and defining the key risk factors.
- Generate a recommended remediation action: The agent suggests a remediation action, using the information gathered during the investigation.
- Answer questions through chat: IT administrators ask the agent questions related to the risky users and the risk summary.
- Store custom instructions in agent memory: Customers can give the agent custom instructions through agent chat, which the agent stores in its memory and applies for future runs. Currently, agent memory can store preferred remediation actions.
Conclusion
The inclusion of Security Copilot and SCUs in Microsoft 365 E5 is more than just a licensing update—it’s a shift toward AI‑first security operations. With predictable capacity, integrated workflows, and zero extra cost, E5 customers can now operationalize AI at scale.
By reviewing this blog post and completing the tasks in here, your Security and IT team will be ready to adopt Security Copilot and make the most of its inclusion in M365 E5